Follow Me On Social Media!
Polar Bear Paws Candy: Indulgent No-Bake Treats to Love
Introduction to Polar Bear Paws Candy
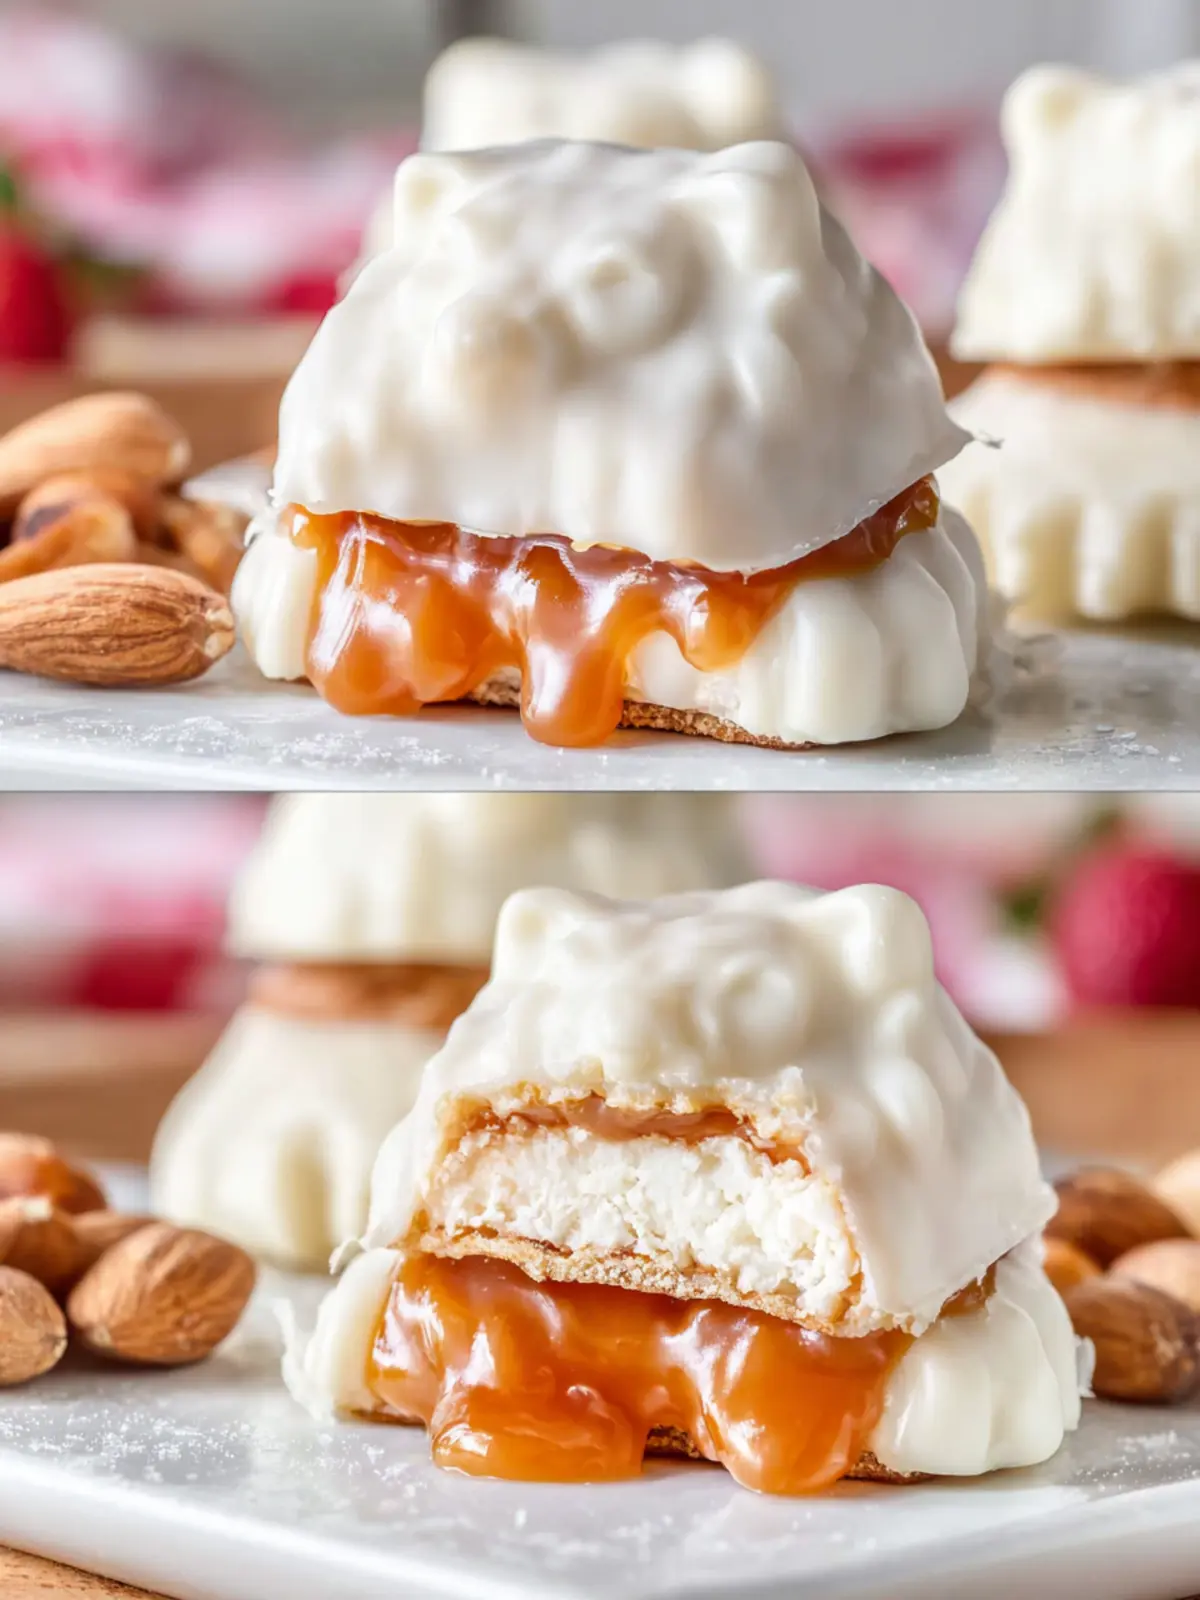
Imagine a winter wonderland where the very essence of cozy comfort finds its expression in bite-sized, delightful treats. That’s exactly what polar bear paws candy brings to the table—an indulgent blend of flavors and textures that evoke childhood memories and spark joy in every bite. This treat combines sweet, creamy white chocolate with crunchy nuts and soft marshmallows, making it an irresistible snack for all ages.
Crafted by mixing simple ingredients, polar bear paws candy calls to mind snowy days spent enjoying hot cocoa while snuggled in blankets. It doesn’t just satisfy your sweet cravings; it also brings a dash of nostalgia, reminiscent of traditional holiday treats. Plus, it’s an excellent way to spread joy during festive gatherings or to simply indulge your own sweet tooth.
What makes Polar Bear Paws Candy so delightful?
The secret behind the allure of polar bear paws candy lies in its rich combination of textures and flavors:
- Creamy White Chocolate: This is the hero ingredient that binds all the elements together. Its sweetness complements the nuttiness of the other ingredients without overpowering them, creating a delicate balance.
- Crunchy Nuts: I prefer using a mix of almonds and pecans for an added layer of crunch, but your choice of nuts can add a personal flair to the recipe. The nuts also provide a satisfying contrast to the creamy chocolate.
- Marshmallows: These fluffy bites melt into the mix, adding an element of surprise and a chewy texture that kids especially love. They also help in giving the candy its iconic ‘paw’ shape.
- Optional Add-Ins: Think of creative additions like crushed cookies, dried fruits, or even colorful sprinkles! They not only enhance the flavor but also make the candy visually appealing.
Ultimately, polar bear paws candy is about bringing people together and reveling in the joys of simplicity. So whether you’re making them for a holiday treat or indulging at home, this delightful candy will surely spark smiles and warm hearts!
Key Ingredients for Polar Bear Paws Candy
Creating polar bear paws candy at home is not only rewarding but also a delightful experience, especially during the holiday season. These sweet treats combine the irresistible flavors of chocolate and peanut butter, making them a favorite for gatherings. Let’s dig into the essential ingredients that will make your candy-making adventure a tasty success.
-
Peanut Butter: A creamy or crunchy variety works well. Peanut butter is the star ingredient, providing a rich, nutty flavor that pairs perfectly with the chocolate coating.
-
Chocolate Chips: Semi-sweet or milk chocolate chips bring sweetness and a gorgeous, shiny finish. Melt them down smoothly to create a coating that’ll make your candy irresistibly delicious.
-
Confectioners’ Sugar: This adds structure and sweetness to the peanut butter mixture, helping the “paws” hold their shape and providing a lovely contrast to the rich chocolate.
-
Butter: Melted butter combines effortlessly with peanut butter and sugar, enhancing the overall creaminess and binding the mixture together beautifully.
-
Vanilla Extract: Just a splash enhances the flavor profile and adds a touch of warmth that rounds out the sweetness of the candy.
When you gather these ingredients, you’ll be well on your way to crafting your own polar bear paws candy!
Why You’ll Love This Recipe
When it comes to making delicious treats, polar bear paws candy is a whimsical choice that never fails to delight. Picture yourself in a cozy kitchen, surrounded by friends or family, as sweet aromas fill the air—this recipe transforms your ordinary snack time into a joyful occasion.
Quick and Easy to Prepare
First off, it’s incredibly simple to whip up! With just a few ingredients, you can quickly satisfy your sweet tooth without spending hours in the kitchen. If you’re juggling a busy schedule, this recipe allows you to indulge in homemade goodness without the hassle.
Family-Friendly Fun
One of the best things about polar bear paws candy is how much fun it is to make. Gather your loved ones, and turn it into a delightful activity. Everyone can join in the process, whether it’s pouring the melted chocolate or arranging the treats for cooling. It’s a great way to bond and the kids will love getting involved!
Irresistibly Sweet
Finally, it’s hard to resist the combination of flavors and textures in this recipe. The creamy white chocolate, combined with crunchy nuts and chewy marshmallows, creates a treat that’s delightful in every bite. Perfect for holiday gatherings or as a special dessert at any time of the year, you simply won’t be able to stop at one!
So roll up your sleeves and get ready; this polar bear paws candy will quickly become a favorite in your home!
Variations of Polar Bear Paws Candy
Creating polar bear paws candy isn’t just about following a recipe; it’s about unlocking a variety of flavor possibilities that can elevate this sweet treat. Beyond the classic combination of chocolate and peanut butter, there are several variations that cater to diverse tastes and dietary needs.
Nutty Bliss Variations
For an enhanced flavor profile, consider adding different types of nut butters. Almond or cashew butter can provide a unique spin while still maintaining that creamy texture we all love. If you’re a huge fan of texture and crunch, toss in chopped nuts such as pecans or walnuts for an added bite.
Flavorful Twists
Imagine the cozy flavors of autumn in your polar bear paws candy. Simply mix in a dash of pumpkin spice or cinnamon for a seasonal twist. Alternatively, a splash of peppermint extract can infuse a refreshing taste, perfect for the holiday season.
Chocolate Lovers’ Delight
To indulge chocolate enthusiasts even more, try using a combination of dark and milk chocolate. This not only deepens the richness but also adds a stunning visual contrast. You can even experiment with white chocolate drizzles for gorgeous presentation.
Dietary Adjustments
For those with dietary restrictions, consider using vegan chocolate and nut-free alternatives. Using sunflower seed butter or a chickpea-based spread can still deliver that creamy goodness without compromising on flavor.
These variations make the simple joy of polar bear paws candy even more exciting, inviting everyone to indulge in their favorites!
Cooking Tips and Notes for Polar Bear Paws Candy
Creating the perfect polar bear paws candy requires attention to detail and a sprinkle of creativity. This delightful treat isn’t just about tastes; it’s about the experience of making something special.
Preparing Your Ingredients
-
Chocolate Melts: Choosing quality chocolate melts is key. Opt for high-quality brands for a creamier texture. If you prefer a little more flavor, consider mixing in some cocoa powder or using dark chocolate melts.
-
Peanut Butter: Natural, creamy peanut butter is essential for a smooth finish. I’ve found that the ones without added sugar create a better balance with the sweetness of the chocolate.
-
Pretzels: Use twist-style pretzels for that perfect crunch! When I first made these, I used stick pretzels, but they didn’t hold the candy well. Plus, the twists provide a more authentic “paw” look.
Assembly Tips
-
Layering: When coating your pretzels, be generous with the chocolate. It should coat the pretzel entirely, making the candy look luscious and inviting.
-
Chilling: After assembling your polar bear paws candy, place them in the refrigerator for quicker setting. This makes it easier to snack on them sooner, especially if you’re entertaining.
Experimenting with Flavors
Feel free to customize your polar bear paws candy! Adding a pinch of sea salt on top brings a delightful contrast to the sweetness. You can even try drizzling some melted white chocolate or colorful sprinkles for a festive touch. Remember, the best recipes are those that reflect your tastes and personality!
Serving Suggestions for Polar Bear Paws Candy
Combining the delightful crunch of pretzels with the sweetness of chocolate, polar bear paws candy offers an irresistibly fun treat perfect for any occasion. Whether it’s a cozy winter gathering or a cheerful summer picnic, the versatility of this candy means it can fit seamlessly into various settings.
Perfect Pairings
-
Hot Beverages: Enjoy your polar bear paws candy alongside a warm cup of cocoa or a seasonal spiced latte. The contrasting textures enhance each bite, making the experience even more delightful.
-
Dessert Platters: Create a festive dessert platter with an array of sweets. Include cookies, mini cupcakes, and of course, polar bear paws for variety. Their unique shape and delicious flavor add visual appeal and fun to any gathering.
-
Movie Nights: Snuggle up with a bowl of popcorn and your polar bear paws candy during movie marathons. The sweet and salty combination keeps everyone reaching for more.
Gift-Worthy Treats
Packaging these candies in decorative jars makes for an excellent gift. Whether for a birthday, holiday, or just because, they’re a sweet surprise for friends, family, or coworkers. The attention to detail wow’s recipients and shares a bit of joy with every bite.
With these serving suggestions, enjoy indulging in polar bear paws candy and sharing the fun with those around you!
Time Breakdown for Polar Bear Paws Candy
Crafting delightful polar bear paws candy is not only a fun process but also a rewarding one. Let’s take a closer look at the time commitment involved in creating these sweet treats, perfect for sharing or indulging in on cozy nights in.
Preparation Time
The preparation time for polar bear paws candy is approximately 20 minutes. During this time, you’ll gather your ingredients, melt the chocolate, and coat your goodies with a layer of nutty goodness.
Cooling Time
Once your candies are assembled, they require about 30 minutes to cool in the refrigerator. This step allows the chocolate to set up well, ensuring that each bite is perfectly crisp and enjoyable.
Total Time
In total, you can expect to spend around 50 minutes making your polar bear paws candy, from start to finish. Isn’t it amazing how quickly such a delightful treat can come together? Make sure to savor each moment as these sweet creations take shape!
Nutritional Facts for Polar Bear Paws Candy
When crafting the delightful polar bear paws candy, it’s not just about the incredible taste; understanding its nutritional profile can guide you in enjoying it mindfully. Here’s a closer look at what you’re eating:
Calories
Each serving of polar bear paws candy typically contains around 150-200 calories, depending on portion size and specific ingredients used.
Protein
You can expect a modest amount of protein—about 2-3 grams per serving. While this snack is not a protein powerhouse, it offers a sweet treat that balances well with more protein-rich meals throughout the day.
Sugars
With its sweet, creamy goodness, polar bear paws candy packs in approximately 15-20 grams of sugar per serving. It’s a treat meant to satisfy your sweet tooth, so indulging occasionally is perfectly okay!
Fats
This tasty candy contains about 7-10 grams of fat, primarily from chocolate and nut ingredients. While it’s not fat-free, a little healthy fat can enhance flavor and texture, making your treats all the more enjoyable.
Enjoy your polar bear paws candy thoughtfully as a sweet escape and a delightful conversation starter during gatherings!
FAQ about Polar Bear Paws Candy
When diving into the delicious world of Polar Bear Paws Candy, you’ll undoubtedly have some questions about this delightful treat. Here’s a handy FAQ to address key concerns and enhance your candy-making experience.
How should I store Polar Bear Paws Candy?
After making your Polar Bear Paws Candy, it’s essential to store it correctly to maintain its delightful texture and flavor. Ideally, keep the candy in an airtight container at room temperature, away from direct sunlight. If you’re in a particularly warm climate, consider refrigerating it, but allow it to come to room temperature before serving. If you use wax paper between layers in your container, it can help prevent sticking!
Can I substitute any ingredients in Polar Bear Paws Candy?
Absolutely! One of the great aspects of this recipe is its versatility. If you’re in a pinch, you can substitute:
- Peanut Butter: Try almond butter or sunbutter for a nut-free alternative.
- Chocolate: Use dark chocolate or even white chocolate to mix things up.
- Candy Mix-ins: Feel free to swap out the nuts or candies based on your preference. Dried fruits or other chocolates can add unique flavors.
How long does Polar Bear Paws Candy last?
When stored properly, your Polar Bear Paws Candy can last for about 2 to 3 weeks. Just make sure to keep it sealed tightly; this helps lock in freshness! If you notice any changes in aroma or texture, it’s always best to err on the side of caution.
What occasions are best for making this candy?
Polar Bear Paws Candy is incredibly versatile and perfect for various occasions! Whether you’re preparing for:
- Holiday gatherings: Its cute appearance complements festive treats.
- Birthday parties: Customize with colorful candies to match the theme!
- Snack for movie nights: Easy to make and fun to share.
- Gifts: Package them beautifully for a thoughtful homemade present.
Whichever occasion you choose, your Polar Bear Paws Candy will surely be a crowd-pleaser!
Conclusion on Polar Bear Paws Candy
Creating polar bear paws candy combines fun and flavor, making it a delightful treat perfect for any occasion. This recipe not only brings a taste of nostalgia but also offers flexibility in ingredient choices, allowing you to make it your own. Whether you prefer creamy peanut butter, rich chocolate, or a blend of both, the versatility is endless. Sharing this sweet delight with friends and family can spark joy and create lasting memories, similar to those sweet childhood days. So gather your ingredients, indulge in the process, and enjoy the delightful results of your homemade polar bear paws candy!
Print
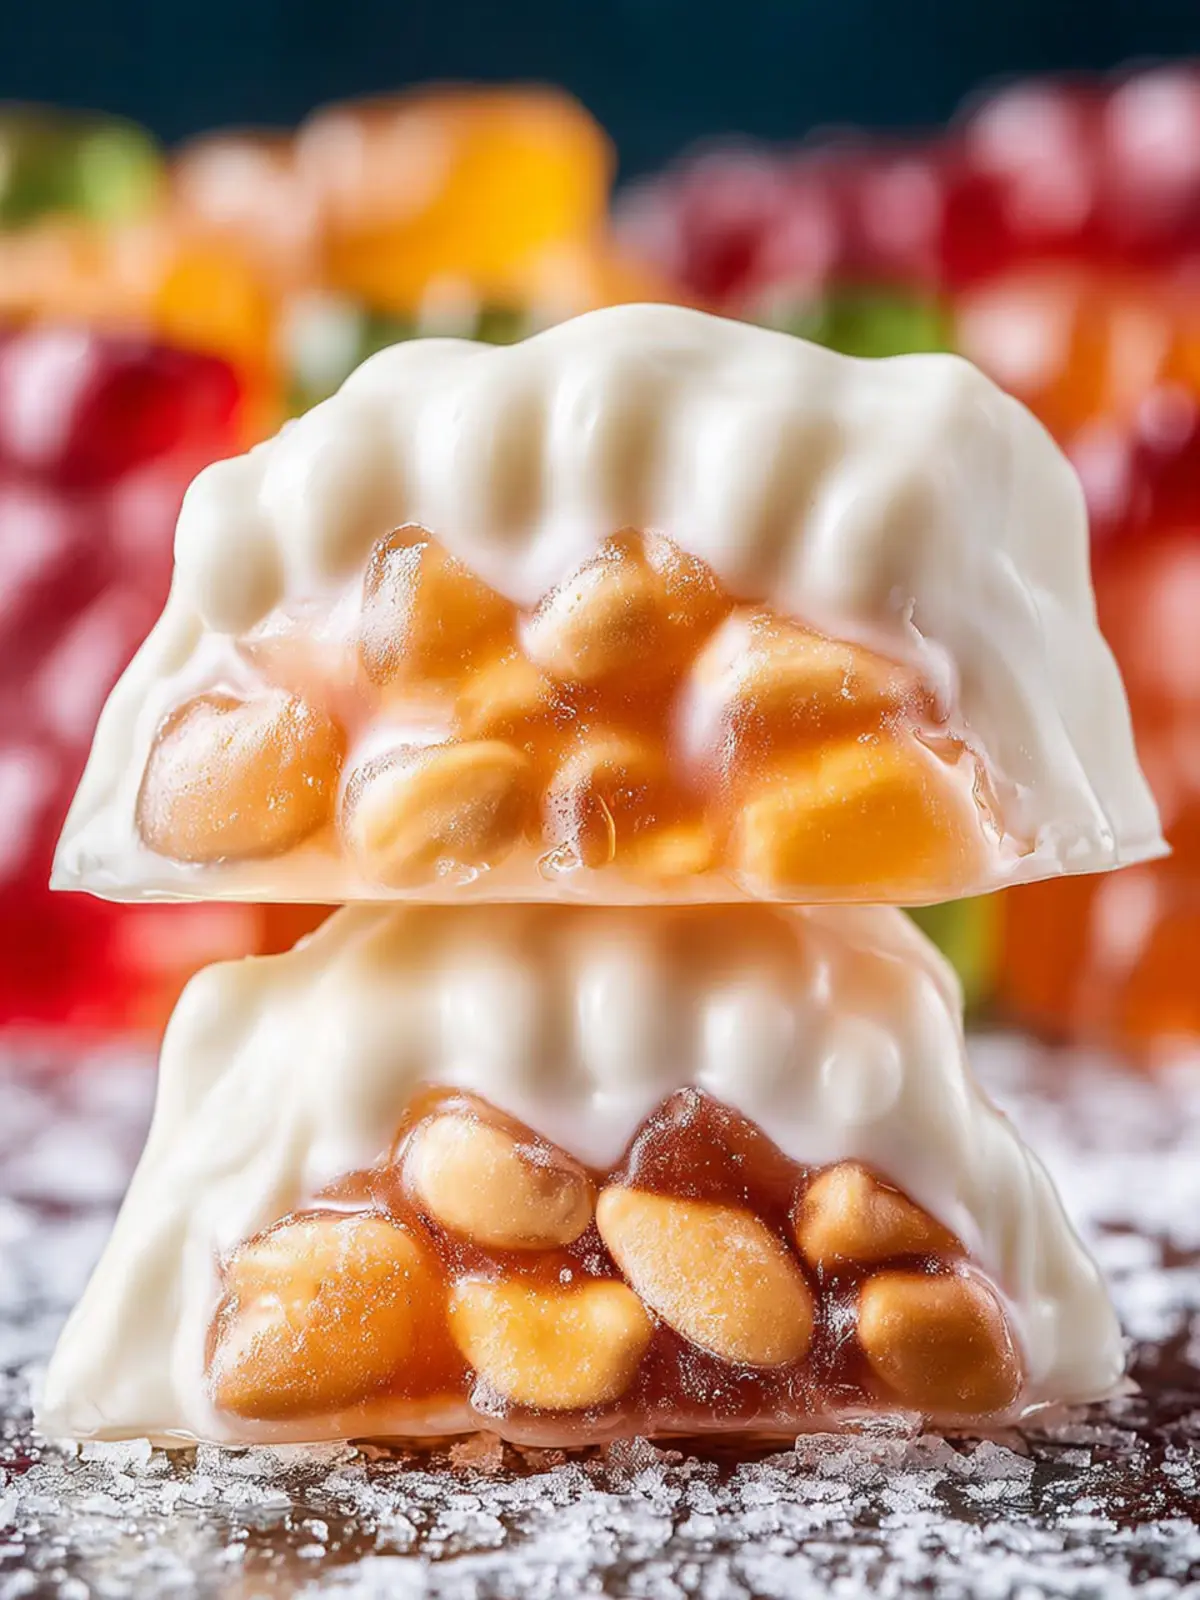
Chocolate-Covered Caramel Peanut Clusters
- Total Time: 1 hour 25 minutes
- Yield: 24 clusters 1x
Description
Delicious clusters of caramel and peanuts coated in smooth almond bark.
Ingredients
Scale
- 11 ounces soft caramels
- 3 Tablespoons heavy cream
- 1 Tablespoon butter
- 1 1/4 cups roasted peanuts
- 10 ounces vanilla almond bark
- 1 Tablespoon coconut oil
Instructions
- In a medium saucepan, add the unwrapped soft caramels, heavy cream, and butter.
- Place over medium heat and stir frequently until the caramels are fully melted and the mixture is smooth and uniform.
- Remove from the heat. Add the roasted peanuts and stir until they are evenly coated. Allow the mixture to cool for 20–25 minutes, stirring once halfway through to prevent the bottom from setting too quickly.
- Line a baking sheet with parchment paper or a silicone mat. Using a medium cookie scoop (1½ tablespoons), portion the mixture into mounds on the prepared sheet. The cooler the caramel is when scooped, the less the clusters will spread.
- Let the clusters cool completely until firm. To speed this up, place the baking sheet in the refrigerator or freezer. Thanks to my warm kitchen in Florida, I have to refrigerate for at least 1 hour.
- Place the vanilla almond bark (or candy coating) and the oil in a microwave-safe bowl. Heat in 20-second intervals, stirring thoroughly after each, until completely melted and smooth.
- Using a fork, dip each cooled cluster into the melted almond bark, letting excess coating drip off, then return it to the lined baking sheet. Once all clusters are coated, refrigerate again briefly if needed until the chocolate is fully set.
Notes
- For best results, refrigerate the clusters as they cool to ensure they firm up properly.
- Experiment with different types of nuts or add sea salt for a sweet and salty combination.
- Prep Time: 15 minutes
- Cook Time: 10 minutes
- Category: Dessert
- Method: Stovetop
- Cuisine: American
Nutrition
- Serving Size: 1 cluster
- Calories: 120
- Sugar: 12g
- Sodium: 50mg
- Fat: 7g
- Saturated Fat: 4g
- Unsaturated Fat: 2g
- Trans Fat: 0g
- Carbohydrates: 15g
- Fiber: 1g
- Protein: 2g
- Cholesterol: 10mg